Create a Search Campaign
Utilize search campaigns to tap into Google’s broad network of web users! Your ads will be seen by customers actively searching for your offerings, helping grow and expand your business.
A campaign type that you have access to in Google Ads is a search campaign.
Search Campaign Benefits
- Reach your goals: Search campaigns can help you in increasing sales, leads, or website traffic.
- Access highly relevant targeting: Target people who are actively looking for your products and services.
- Easy setup: Ads are simple to make and do not necessitate the use of any special assets.
Why Choose Search Campaigns
Sales and leads:
- Increase your online sales and signups.
- If you have a longer sales cycle, consider utilizing leads.
Easy setup:
- Create text ads and choose keywords.
- Special files or assets should be avoided since they are not required.
- Try Smart campaigns that are much easy to set up.
- Highly specific targeting: Reach people who are actively looking for what you have to offer.
What are the instructions for the search campaign?
1. Create a new campaign and set a goal
To begin, create a new campaign on your account and choose a target for your campaign.
Step 1: Login your Google Ads account.
Step 2: Select campaigns.
Step 3: To start a new campaign, click the + icon.
Step 4: Select an objective such as sales, leads, or website traffic.
Step 5: You can also create a campaign without specifying a goal.
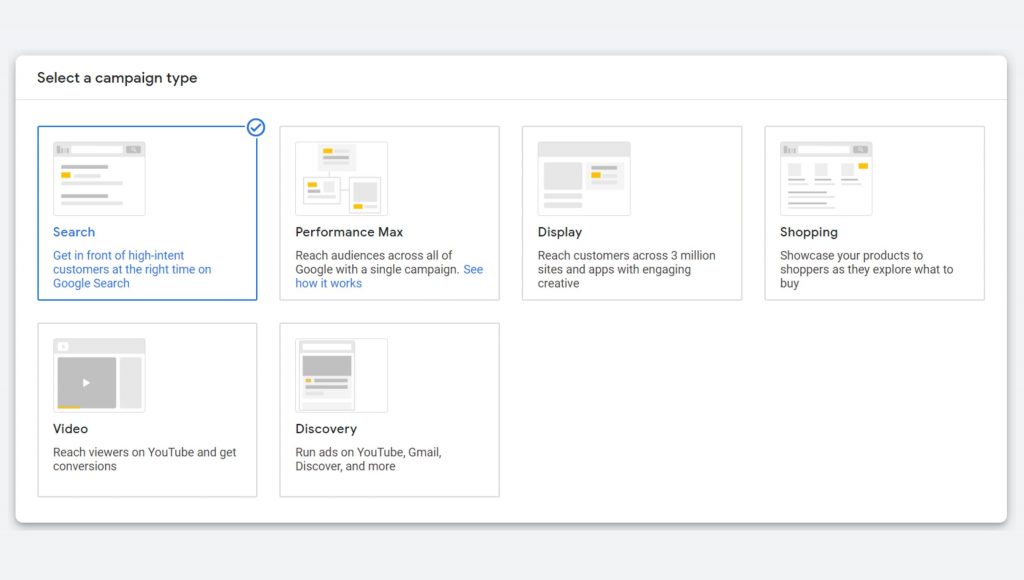
Step 6: Select Search from the “Select a campaign type” menu.
Step 7: Under “Select the methods you’d want to accomplish your objective,” you can enter extra information about your business.
Step 8: Continue by clicking the button
Step 9: On the next page, you’ll give your campaign a name.
2. Select Campaign Settings
You’ll now select who to target with your advertising, how to spend your budget, and how to improve your campaign with assets.
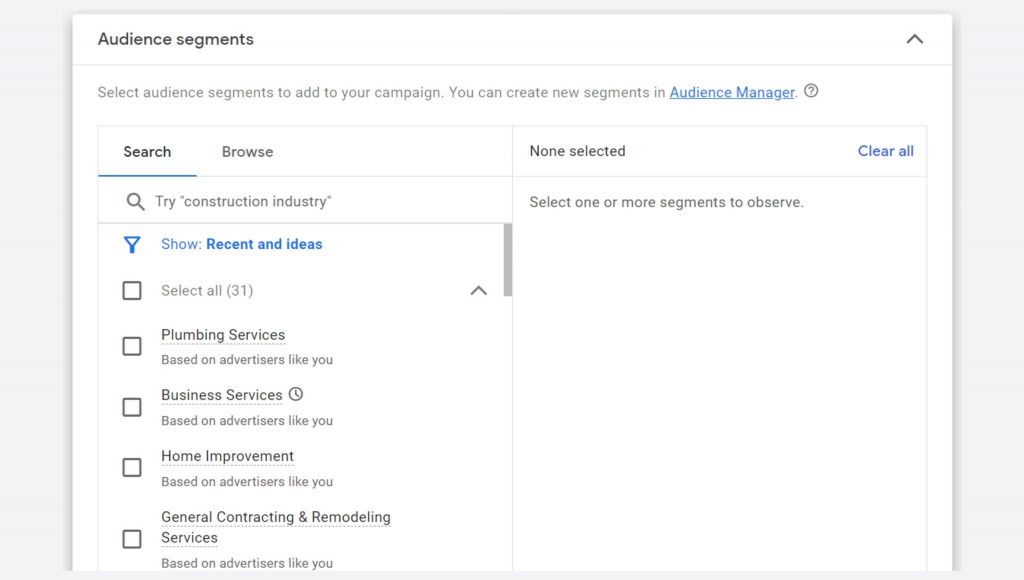
Select your targeting
Create your ideal customer profile and target them with precision. Expand the reach of your ads to multiple search engines by checking off Include Google Search Partners when choosing initial targeting. Put yourself in front of potential buyers, leads, or website visitors for maximum impact!
- If you uncheck this box, your advertising will appear on Google Search Network pages but not on search partners.
- Select Display Network to expand your reach beyond search results to other websites.
- You may adjust your targeting by the association that individuals have with the locations you pick by selecting Location choices.
- Choose the geographic areas where your advertising will display or those you want to omit. Learn how to target advertising based on geography.
- Enter the languages that you want to target. The advertisements and keywords you generate should be in the languages you choose here.
Set up your bidding
Bidding dictates what you want those individuals to do, whereas targeting decides who sees your advertising.
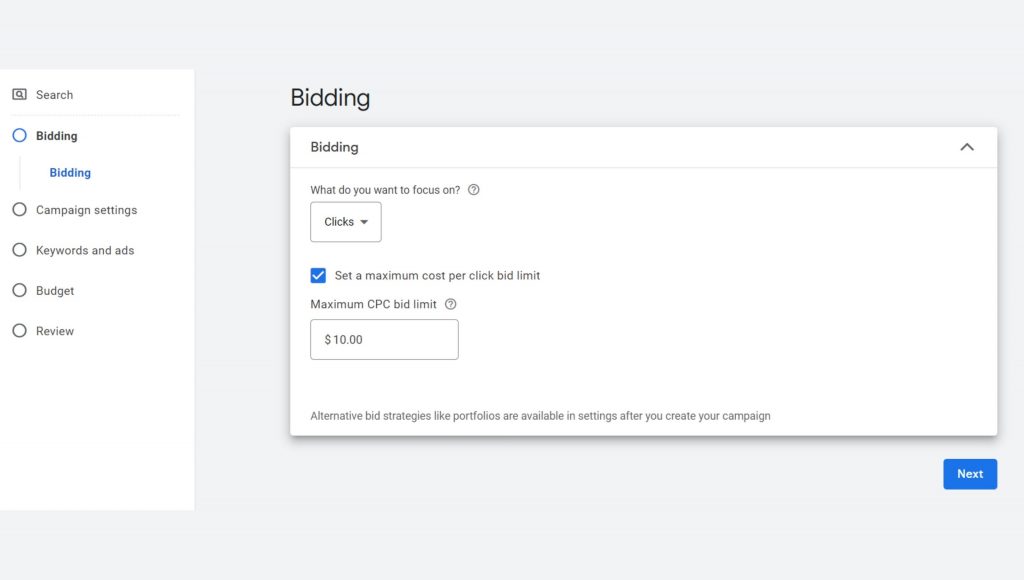
1. As you choose your bidding, think back to your campaign goal:
-
- Do you want sales or leads? You may focus on conversions.
- Do you want more visitors to your website? You may focus on Clicks.
- If you’ve set up conversions and assigned them a value, you might put your money toward Conversion value. With this option, you may specify a specified return on ad expenditure.
- Select Impression Share to increase the frequency with which your ad appears. You might concentrate your efforts on ensuring that your ad appears on a set percentage of visits to relevant search result pages.
2. If you have more bidding experience, you can choose a bid plan directly.
3. To choose further options, click Show more settings.
-
- Conversions: Choose the type of conversion for which you wish to bid.
- Ad schedule: Set a certain time and day for your advertisements to run.
- Ad rotation: Select whether to show advertisements that perform better more frequently or all ads equally.
Enhance ads with assets
Ad assets, such as phone numbers, sitelinks, or lead forms, allow visitors to connect with your ad in a variety of ways. Assets can also increase the size of your ads in search results.
1. Select assets depending on what potential clients could find useful.
-
- Sitelink assets: Browse pages on your site.
- Callout assets: View exclusive offers and promotions.
- Call assets: Call your business.
- Structured snippet assets: See whether you have a list of your products or services.
- App assets: Visit the website or download your App.
- Message assets: Message your business using your Search or Performance Max ad.
- Promotion assets: Get a Discount on a product.
- Lead form asset: Complete a form to receive more data about your business.
- Price assets: View pricing for your products or services.
- Location assets: Find your company’s location and get directions.
- Image assets: Upload pictures to supplement your text adverts.
2. You can create new assets or select assets you’ve already created.
3. Sitelink, callout, and call assets are pre-populated by default. To see all available assets, click + Ad asset.
4. Continue to save your campaign settings and set up ad groups by clicking Save.
3. Set up Ad Groups
After you’ve chosen your campaign parameters, you’ll create ad groups. Each group should be relevant to the online searches of individuals who are interested in your items.
There are two methods for creating ad groups:
Create Standard Ad Groups
The default “Ad group type” is set to “Standard.” Keep in mind that each campaign can only use one type of ad group.
- Name your ad group.
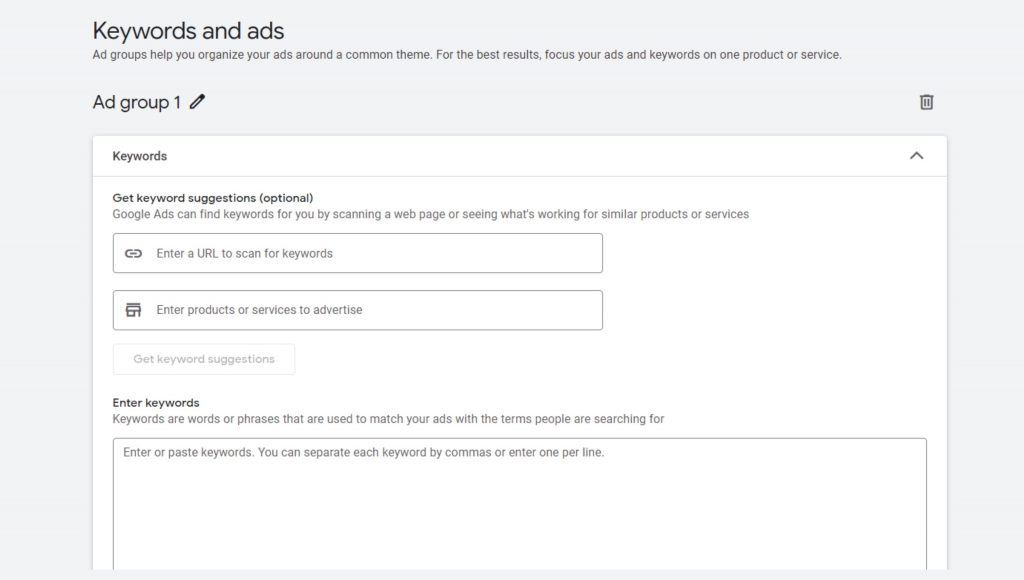
- Separate keywords into a new line. Keywords define where your ads are likely to appear in search results.
- Choose from several keyword match types to decide which searches trigger your adverts. By default, your keywords will be associated with a wide range of similar queries. You can add the following characters to your keywords to affect how they match searches in order to target certain categories of customers:
-
- Phrase match: To match your keyword to a phrase and its nearby variants, use quote marks ” “ around it.
-
- Exact match: To more precisely focus exact searches, use brackets [ ] around your term.
-
- Negative keywords: To exclude searches include a negative symbol – in front of your keyword.
4. Click Save and continue.
Create dynamic ad groups
Keep in mind that each campaign can only use one type of ad group.
- For “Ad group type,” choose Dynamic.
- Name your ad group.
- Enter your website’s domain. This might be a domain or a subdomain.
- Select any of the available categories to target.
- Enter URLs from the domain or subdomain you specified above.
-
-
- Choose pages that are enough connected to be promoted by similar advertising.
-
6. You may also use rules to target pages.
-
-
- For example, if you want your ad group to promote shoes, you may create ads for webpages that have the word “shoe” in the URL, content, or title. You may also build advertising based on a shoe-related category that is relevant to your site.
-
6. To add more ad groups, click + New ad group.
7. Click Save and Proceed to complete setting your dynamic advertisements.
4. Create Search Ads
One of the most important factors to think about when creating search ads is the relevancy of your keywords. Create headlines and descriptions that are relevant to the keywords in your ad group.
It is also recommended to create at least three ads for each ad group.
Create Search Ads Steps
Step 1: Enter the final URL. When someone clicks on your ad, they will land on this page.
Step 2: By default, just the domain will appear in the ad text. If your final URL is “www.example.com/shoes,” your ad will show “www.example.com.” Fill up the display URL to show more of your URL on your ad.
Step 3: Make 1–3 headlines. These headlines will appear as blue text at the top of your ad.
Step 4: By adjusting the display route, you may change the URL that appears on your ad. The page that users land on after clicking your ad will be unaffected by the display URL.
Step 5: Write up to two lines of descriptive text. You have up to 90 characters to describe your product or service and how it is relevant to your clients.
Step 6: Tracking parameters can be added to your URL. These URL modifications might assist you in tracking where your traffic is originating from, such as mobile devices.
Step 7: To finish this ad, click Done.
Step 8: To add more ads to your ad group, click + New ad.
Step 9: Scroll through the ad groups to make sure you’ve produced ads for all of them.
Step 10: Click Save and continue.
Step 11: You may obtain a list of issues that may limit your campaign’s performance from the review page.
Step 12: You’ll get notifications to fix issues with your campaign. For example:
- Billing issues
- Missing keywords or ads
- Invalid final URL
Step 13: To resolve the issues, click “Fix it.”
Step 14: Click the “Publish” button when your campaign is ready.
Step 15: In the “Overview” tab, you can change your settings, ad groups, and ads.
Create Dynamic Search Ads
Google generates your final URL, headline, and display URL automatically using Dynamic Search Ads. You will, however, continue to change your ad description text.
- Write up to two lines of descriptive text. You have up to 90 characters to describe your product or service and how it is relevant to your clients.
- Tracking parameters can be added to your URL. These URL modifications might assist you in tracking where your traffic is originating from, such as mobile devices.
- To finish this ad, click Done.
- To add more ads to your ad group, click New ad.
- Scroll through ad groups to make sure you’ve produced advertisements for all of them.
- Click Save and Continue.
- You may obtain a list of issues that may impede the performance of your campaign from the review page.
- To resolve the issues, click Fix it.
- When your campaign is ready, click the Publish button.
-
-
- In the ‘Overview’ tab, you can edit your settings, ad groups, and ads.
-
5. Choose your budget
While targeting and bidding define who sees your ads and what you want those people to do, your budget affects how many people see your ad.
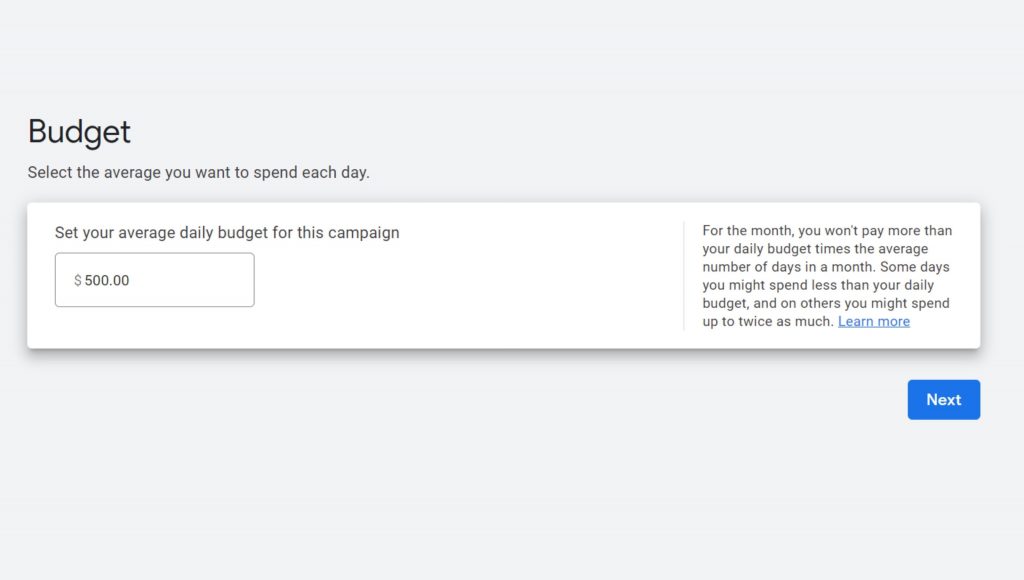
- Enter your daily budget. This is the average amount you wish to spend each day.
- Google will suggest multiple budget alternatives based on a variety of ads that are comparable to the new campaign you’re planning, including similar advertisers and, if relevant, your prior efforts. You will have the ability to choose a unique budget amount in addition to the recommended budget alternatives.
- You may spend more on days when you are more likely to acquire clicks and conversions. However, your budget will average out to the amount you specify here throughout the course of the month. Refer to Charges and your typical daily budget for information.

Do you know why, how, and when to do market research and then how to analyze market research? Let’s understand Read more
Every business owner wants to put their products or services in front of their potential customers. And to get customers Read more
In the past years, LinkedIn has changed a lot. Earlier LinkedIn was known as just a job portal website but Read more
Are you looking for a digital marketing guide to grow your small-sized business? Then you are on the right page. Read more
test